CloudBiometry Help Index
- Download CloudBiometry Mobile App User Guide here
- Download CloudBiometry Web Punch User Guide here
- Download CB4000 Time Clock Manual here
1. Creating your CloudBiometry Account
Open a web browser of your choice, and go to: https://mycloudtime.com.
Click the “+Sign Up” button underneath the header, “Create New Company”.
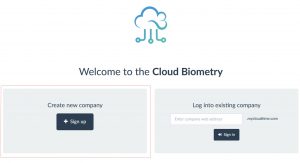
You will be prompted to enter the following information:
- Company Web Address: This will create a unique URL based on the information entered into the text box. For example, entering “MyCompany123” will create the web-address “MyCompnay123.mycloudtime.com”. This will be the address of your login site, so it is recommended to choose something easy, short and memorable. Make sure to use only numbers and alphabet letters, no special characters in this field are allowed.
- Company Name: This is your company’s name, which will appear on the login screen and within the system
- Company Address: The physical address of your company
- Your First Name: The first name of the person creating the account
- Your Last Name: The last name of the person creating the account
- Your Email Address: The email address of the person creating the account. This is used for system notifications and password recovery.
- Contact Phone Number: Phone number of the person creating the account. This is to be used only if the person cannot be reached by email.
- Your Username: The username with which the account creator will log into the system. As account creator, you will be assigned an Administrator role with full system rights.
- Password: Used in conjunction with the username to log into the account website.
- Time Zone: Set the time zone according to how you would like the reports to appear, no matter where the device will be located. For example, if you wish the reports to be shown in Central Time, choose “Central Time”; even if the device will be located within the Eastern Time Zone.
After entering and saving your information, you will be returned to the mycloudtime.com website. The message will indicate that your account has been created successfully, and to check the email address entered for login information.
If you purchased the CB4000 time clock, make sure to connect it to the Internet before logging into your newly created account.
2. Connecting the CB4000 time clock to the Internet
Un-box the CB4000 and power on by plugging the device into 110V outlet.
PLEASE NOTE: It is recommended that an external battery backup with surge protection and voltage regulation be used. In the case of a power outage the CB4000 uses a lithium battery to store information and settings, but will not be available for use. The device has neither an operational battery nor on-board surge protection. Damage due to voltage spikes or surges are not covered by warranty. Also, please make sure to use the included Power Adapter – using third party adapter may ‘fry’ the board and void your warranty.
With the device powered on click the MENU button (keypad icon on the screen). Select: System > Comm. From the Comm screen select and check the following:
- Server Tab: Make note of the device serial number, and ensure that it matches the number in the front of the device manual. If the number in the manual is different, make a note of the actual device number; you will need it to connect the device to your account.
- NTP Tab: Ensure that NTP is set to “YES”
- Ethernet Tab: Both ENABLE and DHCP should be set to “YES”
- WIFI Tab: Both ENABLE and DHCP should be set to “YES”
Connecting via WIFI:
- On the device, go to: MENU > System > Comm > WIFI
- Click SEARCH
- Select the WIFI network you would like to connect to
- Enter the WIFI password (if used)
- Click OK
The device will attempt to connect to the WIFI network and the Internet. This may take several minutes. When the device successfully connects to the network, the word “Connected” will appear under the network name on the network selection screen. To verify the connection, press ESC three times to return to the MENU screen, and click the HOME button.
In the upper-left corner of the home screen, there will be three icons (from left to right): Ethernet, Internet, and WIFI. If your device is successfully connected to any of these, the icon will show as green. For example, a successful wireless connection allowing the device Internet access will show as:
- Ethernet Icon: White
- Internet Icon: Green
- WIFI Icon: Green
![]()
Tips on entering a WIFI password
- ALT: Click this button to cycle through numbers, lower-case letters, and upper-case letters
- Each button is used for 3 letters. Click the button multiple times to reach the next letter
- Example: ABC Button
- A = 1 click
- B = 2 clicks
- C = 3 clicks
- After the correct letter/number appears, wait 1.5 seconds and the cursor will move to the next location
- To enter a symbol, click ALT to enter a letters screen, and click “ ˽ “ several times to cycle through available symbols
- DELETE: Deletes a character
- ARROW: Moves cursor
- ESC: Return to the previous screen
- OK: Enter password and attempt to connect to the network
- Example: ABC Button
Troubleshooting WIFI connection
- All Icons WHITE: Password is incorrect or wrong network selected. Verify that the network selected is the correct one for the password. Verify that the password is correct with another device.
- Ethernet WHITE, Internet WHITE, WIFI GREEN: The device has established a connection to the network, but the network is not allowing the device to access the Internet. This may occur if:
- The wireless signal is not strong enough
- The network has a firewall or “terms of service” page blocking Internet access for the device. An exception for the device MAC address must be made in the network router settings. This may be found on the device by selecting: MENU > System > Comm > Ethernet and scrolling to the bottom of the screen. Contact a Network Specialist to have the adjustment made.
Connecting via Ethernet:
- Connect an Ethernet cable to your router/network switch
- Plug the opposite end of the cable into the CB4000
- Restart the device
When a successful Ethernet connection is established, allowing Internet access, the connection icons will show as:
- Ethernet Icon : Green
- Internet Icon: Green
- WIFI Icon: White
![]()
Troubleshooting an Ethernet connection
- Restart the device and wait for the Ethernet icon to turn green
- Test the connection with another device to ensure that the network port allows access to network and Internet
- Ensure that the cable is undamaged and in working order
3. Logging into your Company's CloudBiometry Account
For this section, you will need:
- Your CloudBiometry account login URL address
- Your CloudBiometry login information (username and password)
Open a web browser and navigate to your CloudBiometry login page using the URL you created (ex. MyCompnay123.mycloudtime.com). Enter the username and password used when you created your account.
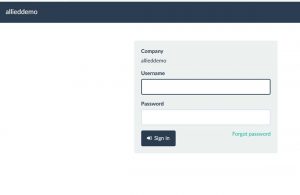
- If you have forgotten your password, click the “Forgot Password” link on the login page. On the subsequent page, enter your username and a link will be sent to the email associated with the username, allowing you to reset you password
- For a forgotten username, have an Administrator login and view the usernames on the MANAGE> Employees page
- If the Administrator username has been forgotten, please contact support: support@cloudbiometry.com
4. Attaching your CB4000 time clock to your CloudBiometry Account
For this section, you will need your CB4000 time clock serial number. This number is located in several places:
- On the device, go to: MENU> System> Server. The Serial number will be at the bottom of the screen
- On the first page of the device manual
- On the device white box
After logging in, notice the Section tabs at the top-right of the page. Click MANAGE > Devices
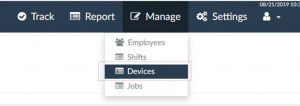
This will take you to the Manage Devices page, where you may monitor and manage the information downloaded to your CB4000. At the top-left of the screen, click the green button labeled “Create Device”.

On the New Device page, you will be prompted to enter the following information:
- Name: A label for your device other than the serial number. This is especially useful when keeping track of multiple devices
- Serial Number: This may be found on the time clock by clicking: MENU button > System > Comm > Server. Additionally, there are two possible locations for the serial number:
- The first page of the time clock manual
- The side of the outer device box
- Location: This setting would only be changed if another location besides “Main” has been created and is in use. A separate location would be required if you had employees working in a different time zone.
Click “Submit” and the device will be attached to your account. You will see the serial number, device name, location, status and the “Edit” button for the device on the Management screen. Click “Edit” to edit any of the information entered for the device.
5. Entering and Editing Employee Information
At the top of any page, click the MANAGE tab and select EMPLOYEES.
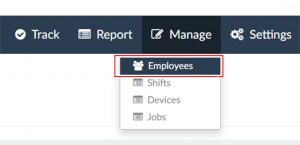
Click the green button labeled “Create Employee” to add a new employee into the system.
You will be prompted to enter the following information for the employee:
- Username: The name which the employee will use to login to the web account and view their time card. Also used as the identifier on the CB4000 device.
- First Name: The employee’s first name
- Last Name: The employee’s last name
- Email: A valid email address for alerts and system notifications
- Role: The employee’s permission level. There are currently 3 levels:
- Administrator: The user has full system rights. May edit any time card. May add, edit or delete any employee. May make changes to the system.
- Supervisor: Must be assigned to a Department. May edit time cards, add, edit or delete employees of assigned Department only. Cannot make system changes.
- Employee: May login and view personal time card only. May punch IN and OUT using web browser (if allowed). May not add, edit, or delete employees or time cards. May not make system changes.
- Payroll ID: An identifier for payroll software, used in CSV/Excel exports of reports
- Hire Date: Date when employee was hired
- Departments: Groupings of personnel; not a physical location. If the user is a Supervisor, they will monitor the users in the Department to which they are assigned. If the user is an Employee, they will be monitored by the Supervisor of that Department. Additionally, Departments determine the jobs available for tracking (if used).
- Location: Assign the employee to the location where they will be punching IN/OUT.
- Pay Rate: The employee’s hourly pay rate (note: if tracking jobs, job rate will override employee rate). Can be left blank.
- Shift: Assign the employee to a particular shift. Shifts are created by going to MANAGE > Shifts.
- Rest Break: Assign an automatic break deduction. Automatic Breaks are created by going to SETTINGS > Breaks
- Archived: Checking this box will archive the employee profile, allowing access to past time cards, but no new punches may be entered. Archived employees are not factored into the monthly service fee.
- Allow Web Punch: Tick the box to allow employee to punch IN/OUT via the web login.
- Manage Time Card (Supervisor Role Only): Tick the box to allow the Supervisor to manage their own time card
- Default Work: Select the Job which the employee will clock into by default, if no Job chosen. Leave blank or select “Main Work” to assign the clock in button to general work.
- Mobile App Settings: See Cloud Biometry Mobile App Guide (separate document).
After all of the information has been entered, click “Save” to create the employee user profile. Click the “Create Employee” button again, and repeat the steps to create another profile.
Assigning a Login Password, Device PIN Code, and Deleting Employee
After enrolling an employee, you will be returned to the Employee Management page. On the right-side of the employee listing, under the “Actions” column, click the “Edit” button.
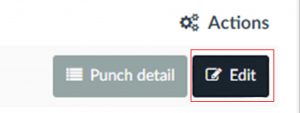
This will take you to the Employee Edit page, where you may change any of the information which you have previously set for the user. Additionally, there are buttons at the top of the employee information list which you may click and do the following:
- Change Password: Assign a password to be used in conjunction with the username to login to the account website
- Set PIN: Set a PIN code to be used on the CB4000 time clock for menu access or punching
- Delete Employee: Delete user profile and records. NOTE: It is recommended that you download a CSV record of the employee time card before deletion, as all the punch data will be erased from reports.

6. Downloading Employees to your CB4000 Time Clock
PLEASE NOTE: If you will be downloading a user registered with the Administrator role, make sure to assign a Device PIN code to the Administrator user before downloading (go to manage employees, edit (Administrator). Once Administrator is downloaded to the device, the device menu will lock and only Administrator credentials may unlock it. If Device PIN is not set, default PIN 9813 will be downloaded.
In your account, click MANAGE > Devices. A list showing the status of any connected CB4000 will appear. Tick the box at the top of the selection column to select all devices. In the upper-left corner of the page, click the button label “Download to Devices”.

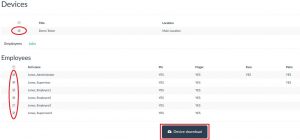
Clicking the button will bring you to the Device Download Management page. This page is divided into two sections: Devices and Employees/Jobs.
Under the Devices header, tick the box next to the name/serial number of the device to which you will be downloading the employee profiles. Under the Employees header, tick the box(s) next to the profiles which you would like to be downloaded to the CB4000 time clock. Tick the box at the top of the selection column to select all users.
In the employees section of the page, you will see columns labeled PIN, Finger, Face, Palm and Card. If a corresponding punch method has been set up, a “YES” will appear for the user under the column header. Until the employee has been downloaded to the CB4000, only a PIN code is available for enrollment. The columns will update after the other methods have been set on the time clock.
Click “Device Download” to begin the transfer.
7. Enrolling Employees at the CB4000 Time Clock
After successfully downloading users to the device, go to the CB4000 and select the MENU button (keypad icon). If an administrator was downloaded to the device, the device menu will be locked.
Accessing Administrator Menu:
- Click the text “Admin Verify”. NOTE: if the text is not selected, and any other part of the screen is touched, the clock will assume you are attempting to punch IN or OUT – not to access the menu. If this punch in/out screen appears, click ESC until you are returned to the home screen and attempt the action again.
- Enter the System ID Number (system-assigned automatically) for an Administrator profile on the device (you can locate it by logging into your account and clicking on manage employees and selecting administrator).
- Click OK
- Enter the associated PIN code (this is a PIN code you have create under Device PIN). If you do not set a PIN for an Administrator a default PIN of 9813 will be set when you download an Administrator profile to the device.
- Click OK
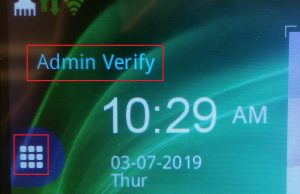
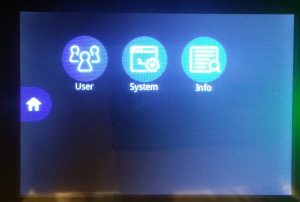
After pressing the MENU button and bypassing the Admin lock (if required), you will be taken to the MENU screen. Click the “User” button.
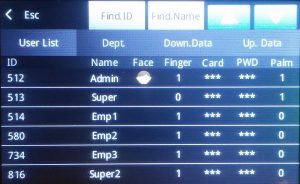
This will take you to the User List screen which shows all employee profiles currently downloaded onto the device. The profiles are listed in order of System ID Number (created automatically by the system) and are identified by Username.
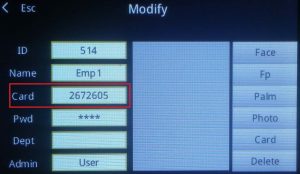
Click on any of the users to enter the Modify screen. On the Modify screen you may see the device settings for the profile, as well as enroll access and punch methods for the device.
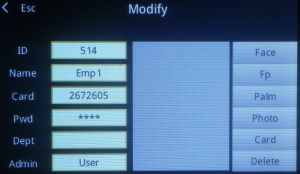
The Modify screen shows the following information:
- ID: The user’s System ID Number. Auto-assigned by the CloudBiometry system, and cannot be changed
- Name: The employee’s username. Set or change through CloudBiometry on the Employee Edit page.
- Card: RFID Card number enrolled for CB4000 time clock access/punching (if used)
- PWD: PIN code for CB4000 time clock access/punching. May be changed on device or within CloudBiometry.
- Dept: not used.
- Admin: Employee device privilege level (may not be changed via device)
- Gen Admin: User credentials may be used to unlock device menu (administrator or supervisor level)
- User: User credentials cannot unlock the device menu (employee level)
- Face: Click this button to enroll a facial profile
- FP: Click this button to enroll a fingerprint profile
- Palm: Click this button to enroll a palm vein profile
- Photo: Creates photo for user device profile. This photo will appear on the Modify screen and when the user punches in or out.
- Card: Enroll an RFID card
- Delete: Delete user from the device only
7.1 Enrolling a Facial Profile
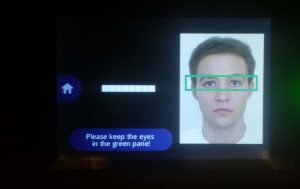
On the User Modify screen of the CB4000 time clock, click the button labeled “Face”. This will take you to the facial scan wizard. Follow the instructions on the screen.
- If glasses are typically worn, then enroll a face scan with glasses on
- Keep your eyes in the green box; if the box moves, reposition/move your eyes so that they remain in the green box
- Scan may take up to a minute
7.2 Enrolling a Palm Vein Profile
NOTE: This is the recommended method of user verification. With palm verification, factors such as hats and glasses will not apply as they might with facial recognition. Additionally, factors such as wet, dry, dirty or scratched skin will not apply as they will with a fingerprint scan.
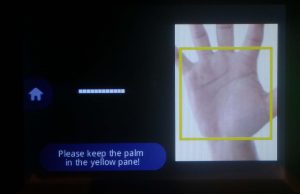
On the User Modify screen of the CB4000, click the button labeled “Palm”. The palm scan wizard will begin. Follow the instructions on the screen.
- Palm scan uses an infrared camera to map the vein in your palm
- Spread your fingers to keep the palm open and flat
- Align your palm with the yellow square; move it forwards and back to align it correctly
- Top of palm should touch top of yellow square, bottom of palm to bottom of square
7.3 Enrolling a Fingerprint Profile
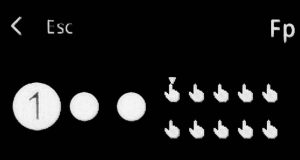
On the User Modify screen, click the button labeled “FP”. This will start the fingerprint scan wizard. Follow the instructions on the screen.
- Fingerprints must be scanned 3 times
- 1 fingerprint per employee may be enrolled
- When the scan is complete, the device will return to the User Modify screen
Tips for Scanning a Fingerprint
- Make sure the employee is pressing their finger firmly on the sensor to show a good, clear read
- Have employees wash and moisturize their hands. Dry skin is more difficult to scan than moist skin.
- Try using hand sanitizer with moisturizer directly before the scan.
- Sometimes, “breathing” on your finger creates enough moisture to allow a better scan.
- Ensure that there isn’t a bright light shining onto the scanner.
- Make sure that the fingerprint scanner is clean and free of smudges or debris.
7.4 Enrolling an RFID Badge
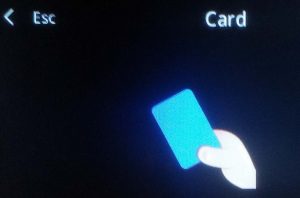
On the User Modify screen, click the button labeled “Card”. The time clock will ask you to scan an RFID badge.
- Hold the badge under the fingerprint scanner
- The device will recognize the badge – card number will show on the User Modify page
8. Clocking IN or OUT on the CB4000 Time Clock
After a verification method has been enrolled for each employee, he or she may clock in and out, clock into a Job, or view their recent punch list. Employees simply scan the media which they were enrolled, and they will be brought to the main device punch menu.
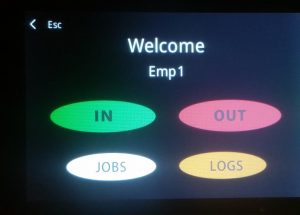
- IN: Employees will click this button to clock into Default Work.
- Default work is set on the Employee Edit screen on your online system management portale (yourcompanysname.mycloudtime.com) . If nothing is selected for Default Work, then the employee IN punch will be labeled as “Main Work” in the time card reports.
- OUT: Employees will click this button to clock OUT if they are taking an unpaid break or if they’re finished working for that day.
- JOBS: Clicking this button brings up the Jobs list (if used). Employee simply clicks on the Job name they will work on next, and he or she will be automatically clocked OUT from the previous job and clocked IN into the new selected Job.
- To clock out of a Job and clock into another Job, the employee would simply click another Job name on the Jobs list
- LOGS: Clicking this button will display a list of recent employee punches (no hours totals).
9. HANDLING DEVICE IS OFFLINE ERROR MESSAGE
Each device must be paired with your account using correct Device Serial Number. If device is successfully paired, but server stops detecting signal, you will see DEVICE OFFLINE message appear in red after logging into your online account. While each device can store punches for later download, this should only be used temporary until communication between your device and online server is re-established. Possible reasons and solutions for the clock (device) not communicating listed below:
- Your device does not have a connection to the Internet, or a clear, consistent, strong WiFi connection to your local network
- If your network connection is poor or unstable, the device will connect, but may go offline for a minute or two when data is uploaded to online server
- Try rebooting (shutting off) your device and allowing a few minutes for connection to re-establish
- If using WiFi connection, force a reconnect by going to Device MENU-> System-> Comm-> WiFi-> Search [Select Network] -> Enter Password
- If network security is present or has been changed, you will need to contact your Network Specialist for assistance and supply them with following instructions: Server address for White-Listing: mycloudtime.com and MAC address location for router exception that can be found on Device MENU-> System -> Comm -> Ethernet
- If you are using WiFi connection, try moving device to a different location with better signal strength; thick walls, microwave ovens, and various types of lighting are examples of everyday objects which may interfere with WiFi signal reception.
